Today’s road bike handlebars come in a variety of shapes and sizes. Some are still the traditional one-piece handlebar-stem set up, while others, especially top-end bikes come with a one-piece handlebar-stem combination.
Having the correct handlebar size is important for your riding comfort, bike handling, and preventing injuries in the medium to long term.
This guide will go discuss how handlebars widths are measured and how to find the ideal width for yourself.
Handlebar measurement basics
There are four measurements that all manufacturers use.
Width

This handlebar width is measured from the center of the left drop to the right drop. It’s commonly referred to as the center to center, or C-C, or hood to hood.
The majority of manufacturers use this measurement. A minority of manufacturers use end-to-end (outside to outside) measurements instead which is generally 20mm more for the same size.
The handlebar width comes in 20mm increments, commonly starting from 380 to 440mm.
Drop

The handlebar drop is measured from the center of the flat top section to the center of the bar end on the drops.
A drop less than 125mm is considered compact and shallow. A drop more than 125mm is considered a classic drop. The more the drop, the lower is your body position when riding in the drops.
Reach
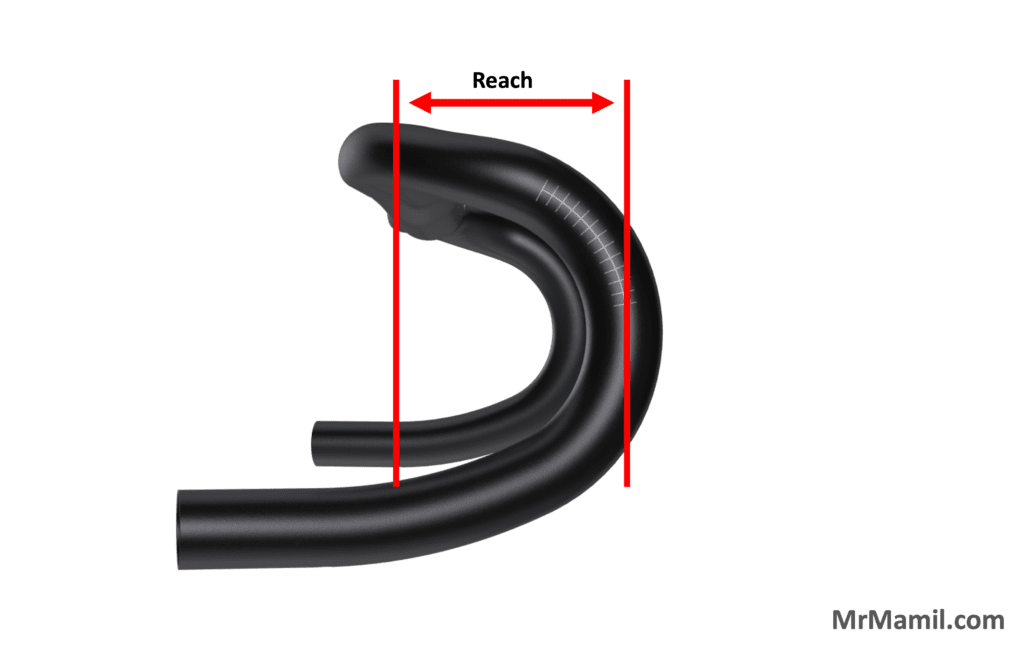
This handlebar width is measured from the center of the flat top section to the bend where the brake hoods are installed.
The reach comes in 5mm increments, usually ranging from 70 to 85mm. A reach of 75mm or lesser is considered a compact handlebar, giving you a more comfortable position on the bike.
Flare
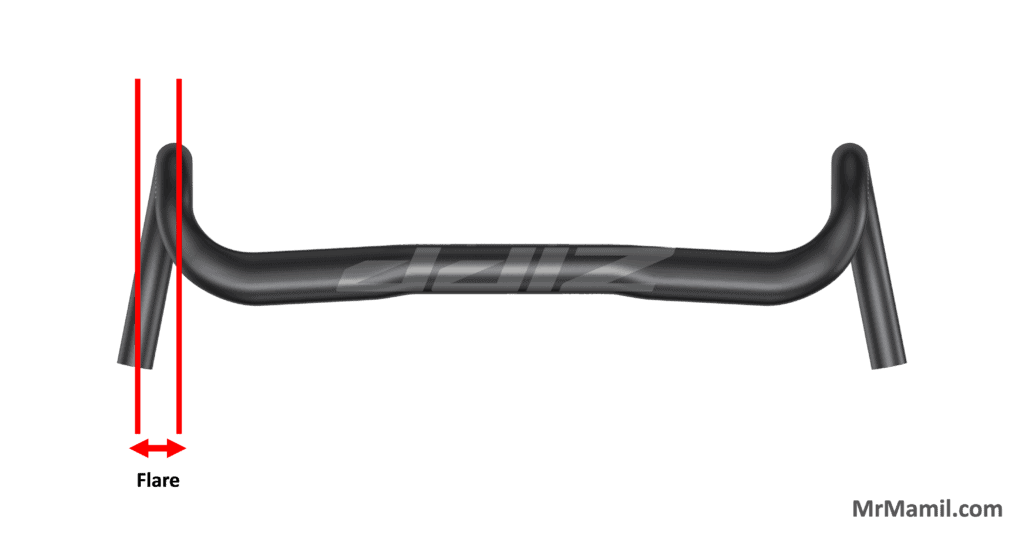
The handlebar flare is defined as the angle at which the bottom of the drops flares outward from the top of the bar. Depending on the handlebar design, the flare can range anywhere from 2º to 30º or more.
A flare of up to 5º is common for road cycling while it’s not uncommon to see gravel bikes having a flare angle up to 30º depending on the rider’s preferences.
How to determine your ideal handlebar width

Stand flat-footed on the ground with your back straight (not hunched). Get a friend to measure the boney protrusions (also known as the acromion process) at the outer front of your shoulders, where the clavicle and acromion meet.
Then add 20mm to the measurement for your ideal handlebar width (measured center to center). If the handlebar width is measured end to end (outside to outside), then add 40mm.

Alex Lee is the founder and editor-at-large of Mr. Mamil. Coming from a professional engineering background, he breaks down technical cycling nuances into an easy-to-understand and digestible format here.
He has been riding road bikes actively for the past 12 years and started racing competitively in the senior category during the summer recently.